How to Archive your Recorded Conference Calls with SimpleVoiceCenter
Our SimpleVoiceCenter system will allow you to save an unlimited number of conference
call recordings under a single account and at any time you or your audience could
listen to these recordings. In addition, the listener could leave you a message,
if you choose to use that feature.
When you have completed this process, any of your recorded conference calls will
be available to your listeners 24/7. Just give them your dial in number, your access
code and the voice box number for this recording.
Recorded Conference Calling Instructions - How to Download your Recorded Conference Call
Upon completion of the recorded conference you will be emailed a Call Detail Report
(CDR) that lists all the callers in the conference. It has a Conference Download
link that will let you save the recording to your PC. This is near the bottom of
the CDR under Quick Links.
Follow the link and you will see the recorded conference.

Select Download.

Select Save - Your system will prompt you as to where you want to save this file.
It is important to remember where you decide to save the file. In Windows this will
usually default to your Desktop or My Documents. Then hit save.
Now that it is saved you will now log into your SimpleVoiceCenter account to upload
it to complete the process.
How to Upload your Recordings to SimpleVoiceCenter
If you are using SimpleVoiceCenter here are the appropriate steps.
1.Login into your SimpleVoiceCenter account. * Go to
www.simplevoicecenter.com, hit the login button in the upper right corner,
enter your Dial in number, access code and password and hit submit.
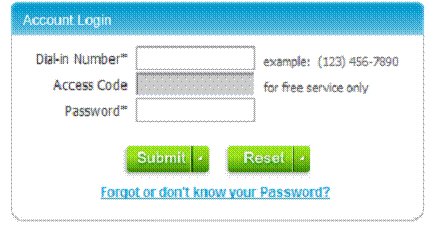
NOTE: If you do not have a SimpleVoiceCenter account, you can register for instant
access to this account here.
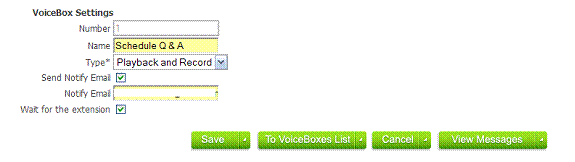
2.Select the appropriate Voice Box by double clicking on it. If you have not created
voice box for this recording, you can add a new one by hitting the Add VoiceBox
link at the top of this grid.
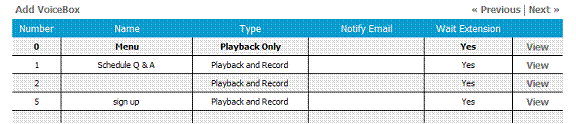
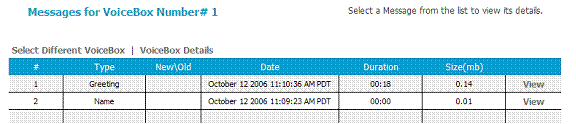
3.Hit View Messages Button – lower right corner.
4. Then select Add Greeting. If you have already created or uploaded a greeting
go to step 5, otherwise, skip to step 6.


5. If you have an existing greeting, then you will double click on the first item
in grid.
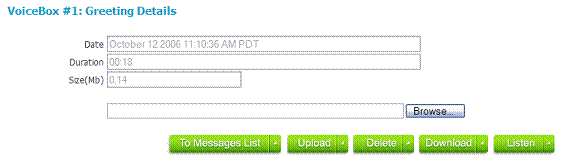
6. Hit the Browse Button and locate the recorded session that you downloaded. Select
it and hit the UPLOAD button.
The system will let you know when this has finished the process. Please note the
uploading process will vary depending upon the size of the recorded file and the
uploading speed of our internet connection.
Upon completion you may need to update your main outgoing greeting to let your callers
know which voice box has the new audio file that you have added to your Simple Voice
Center.
To let your listeners hear this recording you would give them your dial in number,
your access code and the voice box number for this recording.
Additional Tools
Creating a new audio file or Editing your Recorded Conference Call.
In order to do this you will need to have the following with your PC:
- A microphone
- Audio recording/editing application on your PC.
Many PC’s have some form or software that will allow you to record and edit
audio files and all Mac’s have this application.
There are many vendors that offer these applications. To mention a couple, Sound
Forge or Audacity. And some may come packaged with a microphone and headset that
can be purchased from most computer stores. Audacity is available for free on the
web. You can find it at http://audacity.sourceforge.net. Although these applications
have varying learning curve and abilities, they will not take a great amount of
effort to get working.
The beauty of recording your own audio files with your PC is that all of these applications
will allow you to do things like merging two files together, or cutting out a section
of recording that does not fit or even putting in background music.
These can be very powerful tools when you want to take previously recorded conference
calls to put together the perfect training session. It could be as simple as clipping
off the chit chat that may have taken place during the start and end of a conference
call or as sophisticated as combining the best of several recorded conference calls.
For a recorded conference call
After you have downloaded the conference call recording (listed above), you would
then open this file using your editing application. You can easily highlight the
area that you would like to keep, leaving off the chit chat that is usually recorded
at the very beginning and very end. For more information about this please go to
the Using Your PC for audio recording.
This application uses the same controls as Windows, where you would be doing a simple
highlight, copy and then paste into a new file. Export that file as a WAV or MP3
and then upload that to the appropriate SimpleVoiceBox or SimpleVoiceCenter.